TL;DR
Moving your rig into a closet can drastically reduce noise, but it’s about more than just stuffing it in. Proper placement and targeted acoustic treatment solve most problems, with ventilation being the key to keeping your hardware cool. Think of it as a two-step process: block noise and control reflections for the best results.
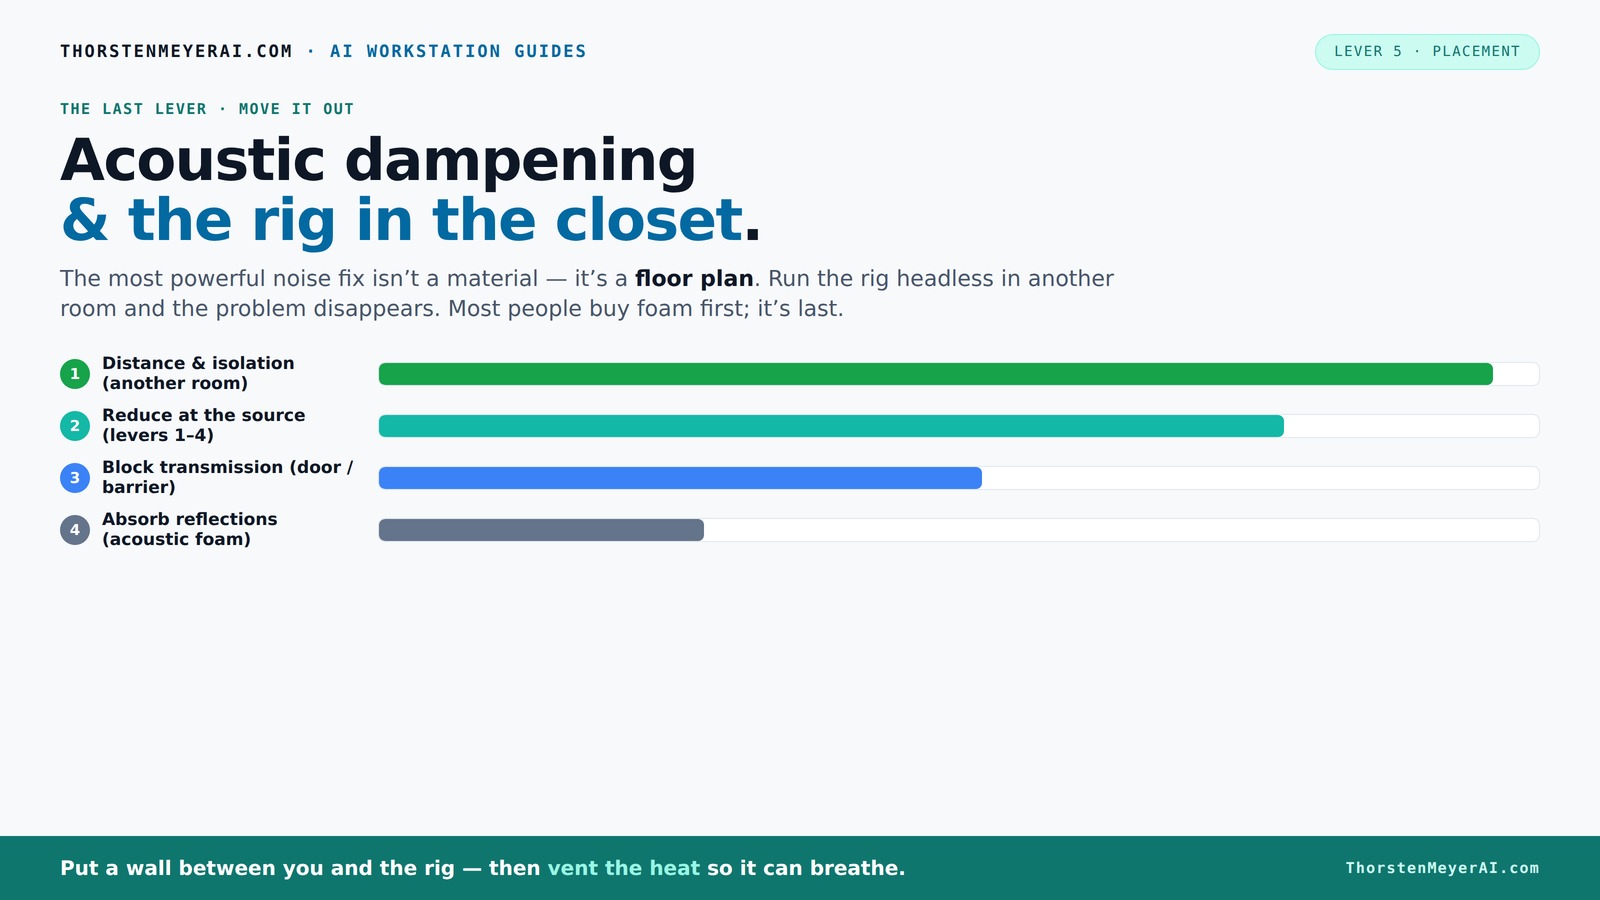
Acoustic dampening
& the rig in the closet.
The most powerful noise fix isn’t a material — it’s a floor plan. A rig you can’t hear because it’s in another room beats any amount of foam. Tap the approaches in Part 1 to see what actually works.
(another room)
(levers 1–4)
(door / barrier)
(acoustic foam)
Contain the noise, not the heat
Key Takeaways
- Prioritize moving your rig into another room or closet to eliminate most noise issues. Distance is the most effective fix. If you want to learn more about creating a quiet environment, visit fudgemylife.org.
- Placement of acoustic panels at reflection points greatly improves sound quality, with about 20-40% coverage being enough for small spaces.
- Don’t underestimate the importance of sealing gaps and adding mass—these are key to blocking noise from escaping or entering the space.
- Ventilation is critical—use quiet fans or ducted airflow to prevent overheating in enclosed spaces.
- Vibration isolation pads are cheap but powerful tools for reducing structure-borne noise that foam alone can’t handle.

Focusound 52 Pack Acoustic Foam Panels 1" x 12" x 12" Sound Proof Foam Panles Soundproofing Noise Cancelling Wedge Panels for Home Office Recoding Studio with 300PCS Double-Side Adhesive
Soundproofing - Acoustic foam panels triangular grooves structure for better noise absorption, helps to reduce and absorb unwanted...
As an affiliate, we earn on qualifying purchases.
As an affiliate, we earn on qualifying purchases.
What’s the real difference between dampening, soundproofing, and treatment?
Acoustic dampening, soundproofing, and treatment aren’t the same—yet they get mixed up all the time. Dampening and treatment are about making the room’s sound better—reducing echoes and reflections. Soundproofing blocks the noise from escaping or entering the space.
Think of it like this: dampening is like putting a soft blanket over a loud speaker—less echo, clearer sound. Soundproofing is like building a wall that noise can’t get through. In a closet, if you want your neighbors to stop hearing your rig, focus on sealing gaps and adding mass. If you want your recordings to sound better, treat the reflection points first. For more on sound treatment techniques, see acoustic treatment strategies.
Understanding these differences helps you prioritize what to address first. Dampening improves the quality of sound within the space, making your audio clearer and less echoey. Soundproofing, on the other hand, is about preventing noise from escaping or entering—crucial if you’re in an apartment or shared space. The tradeoff is that soundproofing usually requires more effort and cost, but it’s essential if external noise is a significant problem. Conversely, treatment is about optimizing the acoustics for recording or listening, which is often enough for a closet setup if done correctly.
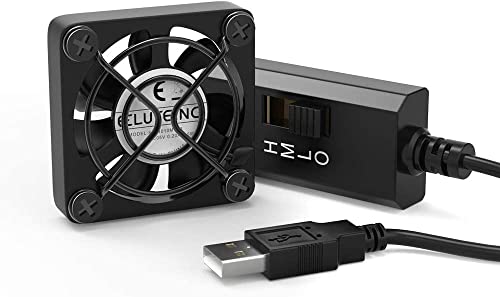
ELUTENG 40mm USB Fan with 3 Speed Control USB Ventilator 5V Max 5300RPM High Flow VR Cooling Fan Compatible for Receiver DVR Playstation Xbox Computer Cabinet Cooling
❤ Mini Cooling Fan: ELUTENG 40mm mini USB cooling fan with 3-speed control, size and super lightweight design,...
As an affiliate, we earn on qualifying purchases.
As an affiliate, we earn on qualifying purchases.
Why closets are nightmare zones for sound—until you fix the basics
Closets are tiny, reflective boxes with hard surfaces. That amplifies echoes and makes everything sound boxy. Plus, the close proximity to walls causes standing waves and bass buildup. Without intervention, your recordings and noise control are fighting a losing battle.
Imagine your voice bouncing off the closet’s walls, echoing back like you’re inside a cave. That’s why placement matters: you want to break up these reflections. Adding soft materials like blankets, rugs, or reflection filters near the mic can help tame the worst of it. But don’t forget, the small space also traps heat, so ventilation is key.
Understanding that these issues stem from the room’s physical properties—its size, shape, and surface materials—allows you to target your interventions effectively. For instance, soft materials absorb high frequencies and reduce flutter echoes, but they won’t solve bass problems. Ventilation is often overlooked but critical: an overheated rig can throttle performance or damage components, so combining acoustic treatment with cooling solutions is essential for a successful setup. For tips on cooling and ventilation, visit doomsdayrobots.com.

Tecmojo 6U Wall Mount Server Cabinet IT Network Rack Enclosure Lockable Door and Side Panels Black, Cooling Fan, Standard Glass Door, 450mm Depth, for 19” IT Equipment, A/V Devices
Save valuable floor space: 6U wall mount server cabinet Dimensions: 13.78" H x21.65" W x17.72" D.Maximum mounting depth...
As an affiliate, we earn on qualifying purchases.
As an affiliate, we earn on qualifying purchases.
Placement rules: Where should you put acoustic panels in a closet?
Start with the reflection points—those spots where sound bounces directly back to your mic or listening position. Use the mirror trick: have a friend move a mirror along the walls while you sit in your usual spot. When you see the panel in the mirror, that’s where it should go. For more detailed guidance on acoustic panel placement, see placement tips.
Key placement tips:
- Side walls: treat the first reflection points to reduce echo and echo-induced noise. Proper placement here prevents sound from bouncing directly into your mic, which causes coloration and muddiness.
- Wall behind the mic: absorb early reflections that hit the back wall, which can color your recordings and reduce clarity.
- Ceiling: if the space is low, treat the ceiling to cut down on flutter echoes. This prevents sound from bouncing overhead and creating a 'boxy' sound.
- Door gaps: seal and add panels if noise leaks through. Gaps can be a significant source of external noise ingress and escape.
For a small closet, roughly 20–40% coverage with foam or panels is enough. Focus on the reflection points first, as these have the most impact on sound quality. Thicker panels (like 4-inch) help with bass issues common in tight spaces, but placement is key—poorly placed panels won’t provide the desired effect and can sometimes make sound worse by creating uneven absorption.

72in 3-Panel Soundproof Room Divider with Wheels, Heavy-Duty Acoustic Partition Temporary Wall for Noise Reduction, Portable Divider for Home Hospital Library Classroom - Light Grey
【Noise Reduction】Our room divider can absorb at least 85% of the noise, creating a quiet environment without being...
As an affiliate, we earn on qualifying purchases.
As an affiliate, we earn on qualifying purchases.
Budget fixes that actually work: Blankets, rugs, and reflection filters
If you’re on a tight budget, don’t dismiss blankets, rugs, and portable reflection filters. These are quick, effective, and non-permanent solutions that can make a noticeable difference. Drape thick blankets over the closet door or wrap a rug around the mic stand to absorb high-frequency reflections and reduce echo. Use a reflection filter close to the mic; it acts as a personal barrier that minimizes early reflections bouncing from the walls.
For example, a thick moving blanket on the door can cut high-frequency reflections significantly, preventing them from bouncing back into your mic. Rugs on the floor absorb bass and reduce overall echo, which can make your recordings sound clearer and more natural. Reflection filters, like the popular ones sold on Amazon, help isolate your voice and minimize room noise, especially in small, reflective spaces.
While these solutions won’t turn your closet into a professional studio, they are cost-effective ways to improve sound quality quickly. Keep in mind that their effectiveness depends on proper placement, and they are most useful as part of a layered approach rather than standalone fixes.
Going pro: sealing gaps, adding mass, and ventilation tricks
For serious noise blocking, sealing every gap around the door and walls makes a huge difference. Use weatherstripping, door sweeps, and sealant to close cracks that allow sound to leak. Adding mass—like extra drywall, damping compounds, or mass-loaded vinyl—can turn a thin barrier into a formidable obstacle for sound transmission. These measures significantly reduce the amount of noise that escapes or enters, creating a more isolated environment.
But the real challenge in a closet is heat. A sealed space traps hot air, which can cook your rig, leading to thermal throttling or hardware damage. To prevent this, install a quiet exhaust fan or ducted ventilation system. Using a small, ducted airflow with a thermostat control keeps your hardware cool without sacrificing silence. Proper ventilation ensures that heat is removed efficiently while maintaining the acoustic integrity of your setup. For detailed guidance, check out [this guide](https://thorstenmeyerai.com/reduce-heat-noise-ai-workstation/) on cooling and noise control in enclosed spaces.
Vibration isolation: why it’s often overlooked but critical
Structure-borne noise—vibrations traveling through the floor, desk, or walls—can be a sneaky source of noise that foam alone doesn’t fix. These vibrations often produce low-frequency hums that transmit into your equipment, causing unwanted noise or even hardware issues. Placing anti-vibration pads or rubber feet under your rig’s stand can significantly reduce this transmission. For instance, if your GPU or PC case is on a wooden desk, a simple rubber mat can cut noise transmission by 50% or more. In utility closets, mounting equipment on vibration-absorbing pads prevents low-frequency hums from radiating into your space. Addressing vibrations is crucial because they often go unnoticed but can undermine your entire noise reduction effort. By isolating your equipment from the surface it sits on, you prevent the hums and rumbles from becoming part of your audio environment, ensuring cleaner recordings and quieter operation.
How much treatment is enough? Finding the sweet spot
Many people overdo acoustic treatment, deadening their room and sacrificing liveliness. In small spaces like closets, about 20–40% coverage with panels is usually enough to improve clarity without making the space sound unnatural. Focus on the reflection points—areas where sound bounces directly into your mic or ears—and corners for bass trapping if needed. Over-treating can lead to a sterile, echo-free environment that hampers natural sound perception. Instead, aim for a balanced approach: treat only the critical reflection zones and keep some natural room characteristics intact. For example, if you notice a boomy bass or echo, add bass traps in the corners, but avoid covering every surface. This targeted strategy preserves the room’s liveliness while controlling problematic reflections, resulting in a more natural and accurate sound profile.
Advanced tricks: sealing, insulation, and DIY upgrades
For those wanting a more permanent solution, sealing gaps around the door, adding extra drywall with damping compounds, or insulating the walls can significantly boost soundproofing. Some DIY enthusiasts install mass-loaded vinyl or damping mats inside the door for added blocking. These measures increase the mass and reduce the transmission of sound waves through structural elements. In utility closets, treating the walls with insulation or adding damping layers can further diminish noise leakage. While these upgrades involve more effort and expense, they can transform a noisy closet into a near-isolation chamber, especially if combined with sealing and vibration isolation. This approach is ideal for those seeking a long-term, high-performance setup where noise and heat are persistent problems.
Your quick-start checklist for a quiet, cool closet rig
- Place your rig in a different room if possible. Use a wired connection for stability.
- Treat reflection points with panels or blankets.
- Seal gaps around the door and add mass if needed.
- Ensure ventilation—install a quiet exhaust fan or ducted airflow.
- Use vibration isolation pads under equipment.